FSGUI=( FREESWITCH GUI PBX CTI 呼叫中心中间件) 简要使用说明
# FSGui###QQ群: 293697898 FreeSWITCH+Kamailio+OpenSIPS
安装手册: [http://www.nway.com.cn/uploads/2017/02/150823273563.pdf](http://www.nway.com.cn/uploads/2017/02/150823273563.pdf )
v2.2.2使用手册: [http://www.nway.com.cn/uploads/2017/02/150818404259.pdf](http://www.nway.com.cn/uploads/2017/02/150818404259.pdf )
FSGui是由上海宁卫信息技术有限公司自主研发的新一代的呼叫平台,它将云呼叫、VOIP、PSTN、IMS、DID、IVR等集成在一起,实现将IP网络和传统通信通过语音完美结合在一起。并为第三方呼叫及事件查询提供RESTful接口。
FSGui 优势是什么?
1. 处理能力更强,内存数据库+PG+ GOLang天生的高性能。
2. 数据更安全,只要硬件到位,那我们的数据就可以进行实时热备,以及更多的如读写分离等,且数据库是PostgreSQL的,它是开源的。
3. 对接设备更丰富,从思科到avaya到华为到其它厂商均可支持。
4. 业务流与通信流分离,通信流保证最稳定的媒体能力,业务流来控制媒体内容。
5. 扩展更丰富,可以方便的引申出更多通信领域的增值服务。
6. 使用更简便,我们可以做到由GUI配置而减少初级工程师或客户人员的工作量。
7. 服务更到位,专业的人可以做专业的事。
针对FreeSWITCH开发的GUI及更底层的PBX功能扩展,小并发免费二进制
###整个系统分为如下的结构
####结构图
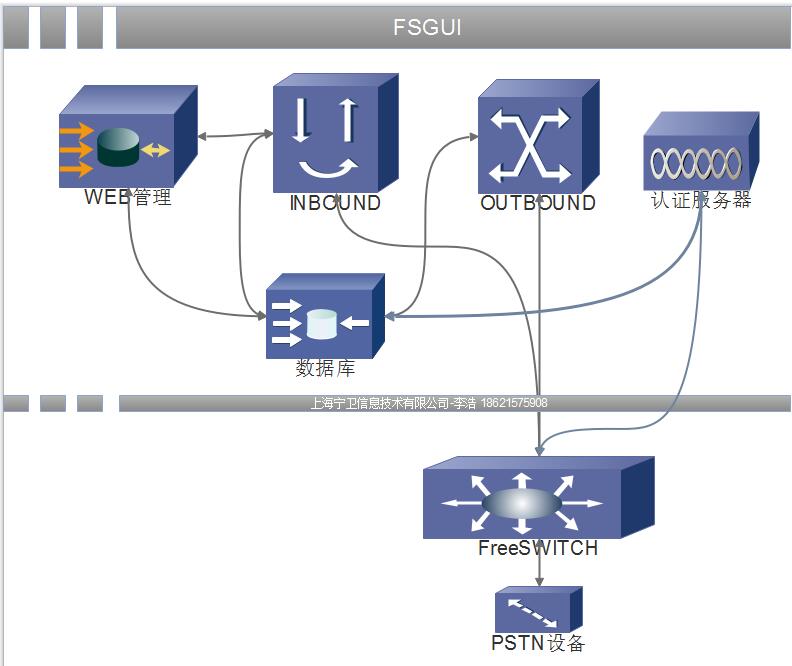
####应用说明
- WEBServer nway_pbx_web 用于处理所有的web访问,但不包括restful接口
- AUTHServer nway_pbx_auth 用于处理FreeSwitch的Register消息
- PBXServer nway_pbx 业务主应用,用于处理路由,网关,IVR等呼叫业务层
- FreeSwitch
- Postgresql
- Redis
- rings/common 用于报工号等通用的一些语音彩铃
GUI测试登录: http://139.196.40.50:8080/index ,admin 123456
注:FSGui是基于FreeSwitch进行的二次封装,在特大并发时,我们采用各种优秀的其它商业套件或,Opensips、Kamailio作前置,可参考 http://www.6fok.com/topics/2
###功能概要
```
1. 路由管理
2. 录音管理
3. 分机管理
4. 分机组管理
5. 网关管理
6. 网关组管理
7. 区域策略管理
8. 时间策略管理
9. 报工号
10. 按键IVR
11. 自动语音智能IVR
12. 排队管理
13. 报表管理
14. 黑名单管理
15. 彩铃管理
16. 电话会议管理
17. 控制接口,发起呼叫,记录通话过程中的各种状态,并与第三方应用进行交互
18. 会议控制接口 ,可与第三方应用进行交互
19. 与第三方CRM等对接接口,支持restful或socket,支持python php java c++ c ruby golang等开发语言
20. 转码服务(G711,G723,G722,G729,ILBC,OPUS,ARMNB,GSM...)
21. IMS接入
22. 。。。。。。
```
### 使用说明书:
http://freeswitch.net.cn/100.html
来去电,摘机,挂机,响铃等消息,使用代码
https://github.com/nwaycn/FSGui/blob/master/EventOrCDR.py
Restful接口调用示例:
https://github.com/nwaycn/FSGui/tree/master/CallInterface
-------------------------------------------------------------------------------------------------------------------------------------
##安装和更新日志
###特别提醒: 注意防火墙
###Centos 6 FSGUI ISO镜像安装 (推荐)
####下载
https://pan.baidu.com/s/1slctYYL
####安装
使用光盘刻录机或ultraiso等工具把iso镜像写入u盘,由光盘或u盘引导后启动,进行自动安装。
用户: root, 密码: Nway123
FSGUI主路径: /opt/fsgui
Postgresql 路径: /usr/pgsql-9.6/
Postgresql data 路径 : /db/pgsql/data
Postgresql 的超级用户 postgres的密码: Nway2017
如果修改了postgres的相关信息,则需要配置两项:
/usr/local/FSGUI/conf/app.conf 文件中为web配置
/usr/local/FSGUI/Nway.conf 文件为后台和认证服务应用的配置
####配置
这里的配置,主要是网络ip的配置
#####vi /etc/sysconfig/network-scripts/ifcfg-eth0
```
DEVICE="eth0"
BOOTPROTO="static" 改为static
HWADDR="08:00:27:28:44:81"
IPV6INIT="no"
NM_CONTROLLED="yes"
ONBOOT="yes" 改为yes
TYPE="Ethernet"
UUID="7d03dad6-2c06-402a-8e6b-8224764e91d3"
IPADDR=192.168.1.205 改为自己的ip
GATEWAY=192.168.1.1 实际的路由网关
NETMASK=255.255.255.0 子网掩码
```
接着,就可以重启了,就可以用了
Web管理界面为 : http://ip:8080/index admin 123456
管理控制接口地址 : http://ip:8085 认证用户在Nway.conf中:
restuser=admin
restpassword=admin
ip:8083为针对 FreeSwitch的OutBound服务
ip:3000为针对 FreeSwitch的认证服务
##Windows下运行:
下载或用git clone windows binary package
https://github.com/nwaycn/FSGui/tree/master/Windows
为了避免下载慢,在百度云盘存储的压缩包在下,以后有更新,直接会列于下方:
2016-12-20更新:
增加来电黑名单管理、呼入电话会议等的GUI配置和功能
[http://pan.baidu.com/s/1nuUZjg1](http://pan.baidu.com/s/1nuUZjg1 "http://pan.baidu.com/s/1nuUZjg1")
2016-10-24更新包:
下载地址:
http://pan.baidu.com/s/1pLxZmY3
2016-10-3更新包:
第一个英文FSGUI版本压缩包:
[http://pan.baidu.com/s/1jI6oQG2](http://pan.baidu.com/s/1jI6oQG2 "http://pan.baidu.com/s/1jI6oQG2")
2016-09-13更新包:
[http://pan.baidu.com/s/1c260hsW](http://pan.baidu.com/s/1c260hsW "http://pan.baidu.com/s/1c260hsW")
2016-09-07更新包:
[http://pan.baidu.com/s/1c23HXPQ](http://pan.baidu.com/s/1c23HXPQ "http://pan.baidu.com/s/1c23HXPQ")
web访问地址:
localhost:8080 默认用户名 admin,123456
###先执行InstallPreService.bat后再执行 Start.bat,已测试windows 2003,2008下可以,win8,win10不可行,如有问题可以查看windows的服务中,redis freeswitch,postgresql三个的服务启动是否正常
正常应会有nway_pbx_web.exe, nway_pbx_auth.exe, nway_pbx.exe三个启动,FreeSwitch和redis及Postgresql已作为服务运行
##Debian 8 下运行:
###Virtual Box虚拟机安装:
下载: http://pan.baidu.com/s/1eSolxJ0
需要下载: https://www.virtualbox.org/
系统为debian 8,64位,所以一定要支持64位虚拟化
用户: root, 密码: Nway123
FSGUI主路径: /usr/local/FSGUI
Postgresql 路径: /usr/local/pgsql
Postgresql data 路径 : /db/pgsql/data
Postgresql 的超级用户 postgres的密码: Nway2017
如果修改了postgres的相关信息,则需要配置两项:
/usr/local/FSGUI/conf/app.conf 文件中为web配置
/usr/local/FSGUI/Nway.conf 文件为后台和认证服务应用的配置
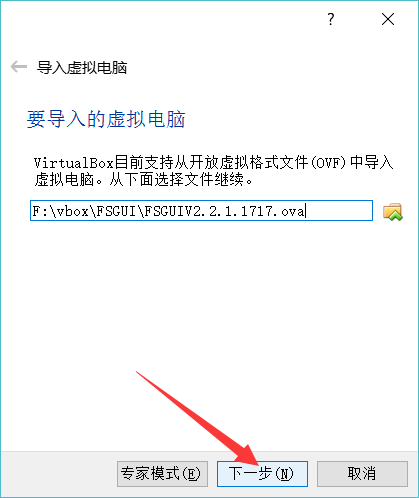
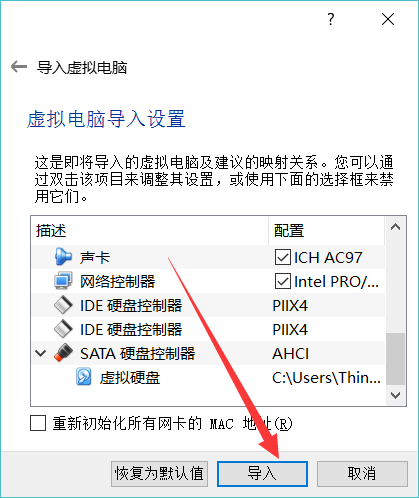
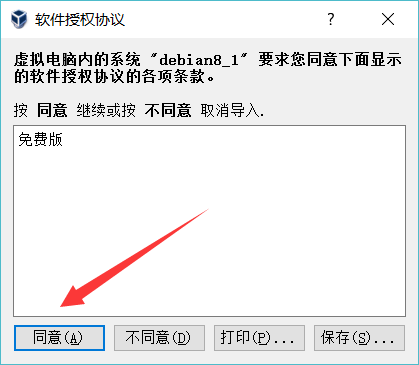
从virtual box中使用这个包:
点击: 管理->导入虚拟电脑
1.
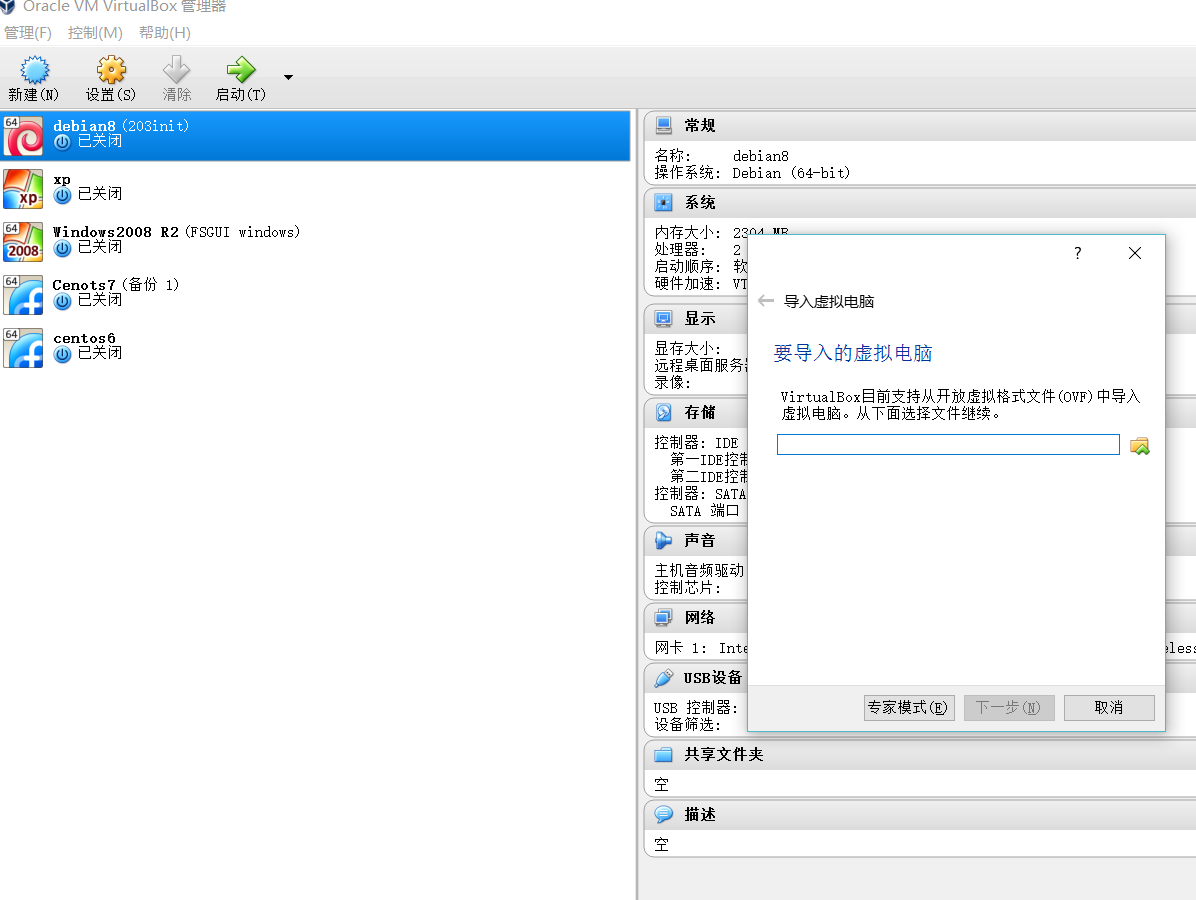
2
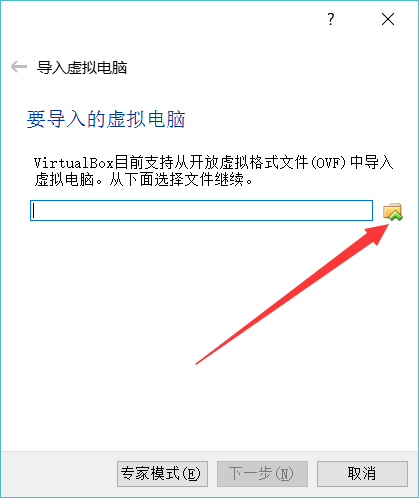
3.
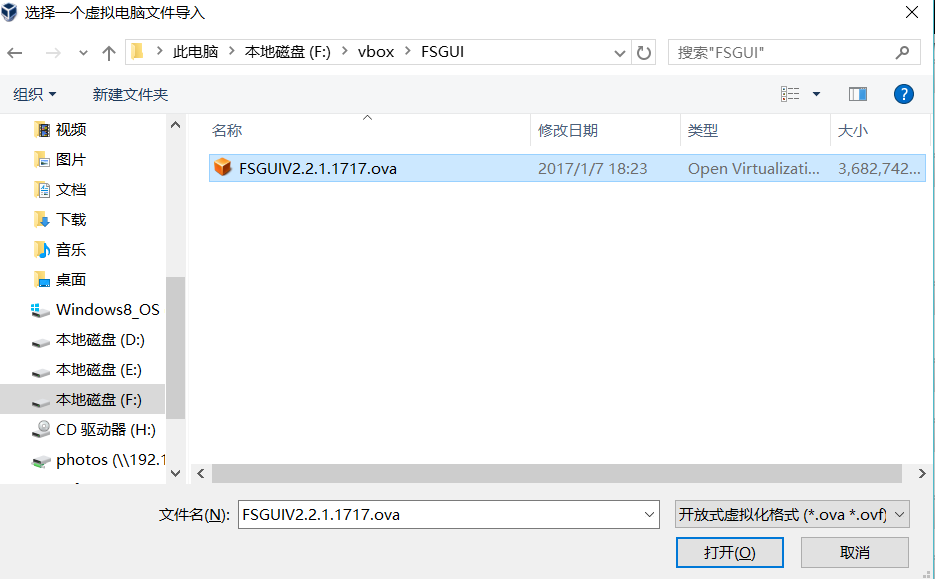
4.
5.
6.
7.
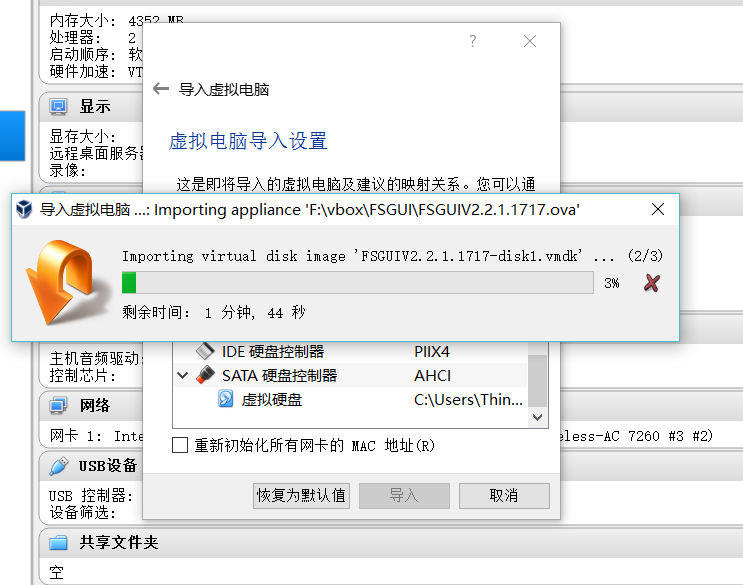
然后就可以导入后使用啦
注意:
网络默认地址: 192.168.1.203 ,可以自行修改
Web管理界面为 : http://ip:8080/index admin 123456
管理控制接口地址 : http://ip:8085 认证用户在Nway.conf中:
restuser=admin
restpassword=admin
ip:8083为针对 FreeSwitch的OutBound服务
ip:3000为针对 FreeSwitch的认证服务
###手工安装
需要自行安装 FreeSwitch,Redis,Postgresql
编译好的基于debian 8 64位的FreeSwitch二进制包可以下载:
http://pan.baidu.com/s/1hrMvI0s
或者,freeswitch,redis,nwaypbx等的二进制包,下载地址:
http://pan.baidu.com/s/1o77qz8Y
需要预先安装一些第三方包,如下:
wget -O - https://files.freeswitch.org/repo/deb/debian/freeswitch_archive_g0.pub | apt-key add -
echo "deb http://files.freeswitch.org/repo/deb/freeswitch-1.6/ jessie main" > /etc/apt/sources.list.d/freeswitch.list
apt-get update && apt-get install -y freeswitch-meta-all
如果是FSGui-Debian8-20161217.zip,则要如下操作:
1. 解压压缩包到/usr/local下,保证 /usr/local/freeswitch/bin/freeswitch路径、/usr/local/nwaypbx/nway_pbx 、 /usr/local/redis/src/redis-server 是有效的
```
+---db
+---freeswitch
+---nwaypbx
| +---assets
| | +---avatars
| | +---bootstrap-datepicker-1.6.4-dist
| | | +---css
| | | +---js
| | | \---locales
| | +---css
| | | +---images
| | | \---img
| | +---examples
| | +---font-awesome
| | | +---4.1.0
| | | | +---css
| | | | \---fonts
| | | \---4.2.0
| | | +---css
| | | \---fonts
| | +---fonts
| | +---img
| | +---js
| | \---locales
| +---conf
| +---controllers
| +---entity
| +---libs
| +---models
| +---routers
| +---service
| +---static
| | +---css
| | +---img
| | \---js
| +---tests
| \---views
| +---agent
| +---baseconfig
| +---cdr
| +---conference
| +---dialplan
| +---dialplandetail
| +---error
| +---extension
| +---fifo
| +---gateway
| +---gatewaygroup
| +---ivr
| +---ivrdetail
| +---layout
| | \---sections
| +---log
| +---main
| +---report
| +---ring
| +---system
| +---timeplan
| \---user
\---redis
+---deps
| +---geohash-int
| +---hiredis
| | +---adapters
| | \---examples
| +---jemalloc
| | +---bin
| | +---doc
| | +---include
| | | +---jemalloc
| | | | \---internal
| | | \---msvc_compat
| | | \---C99
| | +---lib
| | +---src
| | \---test
| | +---include
| | | \---test
| | +---integration
| | +---src
| | +---stress
| | \---unit
| +---linenoise
| \---lua
| +---doc
| +---etc
| +---src
| \---test
+---src
+---tests
| +---assets
| +---cluster
| | +---tests
| | | +---helpers
| | | \---includes
| | \---tmp
| +---helpers
| +---integration
| +---sentinel
| | +---tests
| | | \---includes
| | \---tmp
| +---support
| +---tmp
| \---unit
| \---type
\---utils
+---create-cluster
+---hashtable
+---hyperloglog
+---lru
\---releasetools
```
2. 按 http://freeswitch.net.cn/27.html 安装postgresql
3. 使用pg_dump导入解压包中db/nwaycc161216.backup 确保postgresql已启动
4. chmod +x /usr/local/freeswitch/bin/*
5. chmod +x /usr/local/nwaypbx/nway_pbx*
6. chmod +x /usr/local/redis/src/redis-*
7. 启动freeswitch # /usr/local/freeswitch/bin/freeswitch -nc
8. 启动redis # /usr/local/redis/redis-server
9. 启动nway_pbx相关的 #cd /usr/local/nwaypbx/
10. nohup ./nway_pbx & && nohup ./nway_pbx_web & && nohup ./nway_pbx_auth &
------------------------------------------------------------------------------------------------------
从github下载的包需按以下操作
1. 使用pg_dump导入 https://github.com/nwaycn/FSGui/blob/master/Debian8/db.backup
2. 使用https://github.com/nwaycn/FSGui/tree/master/Debian8/Freeswitchconf/conf 替换FreeSwitch的默认配置
3. 启动Redis
4. 启动freeswitch
5. 启动postgresql
6. 修改nway.conf和conf/app.conf 中的连接字符串及端口等数据
6. 等待大约1分钟后启动nway_pbx_web nway_pbx_auth nway_pbx
-------------------------------------------------------------------------------------------------------------------------------------
Changelog:
-------------------------------------------------------------------------------------------------------------------------------------
2016-8-31 14:30
增加批量生成网关或IMS对接的gateway页面及接口, 操作步骤: 网关管理 ->网关列表-> 批量创建
然后下载模板按实际数据编辑excel表格后上传,并提交即可。
-------------------------------------------------------------------------------------------------------------------------------------
可以试着用 http://nssm.cc/commands 这个工具注册exe为windows服务
程序下载,可以从github.com上拉下对应的系统包进行运行
[https://github.com/nwaycn/FSGui](https://github.com/nwaycn/FSGui "https://github.com/nwaycn/FSGui")
####截图手册
1. 登录

2. 首页

3. 先进行基础配置

对于系统运行所需的一些路径参数进行配置
4. 彩铃配置

进行彩铃配置前,先上传一个彩铃后,把路由配置和ivr配置中的相关彩铃先删除后,再删现有彩铃
5. 分机列表

6. 添加分机

新添加的分机,在nway_pbx_auth启动后,则ip话机或其它voip方式应用就可以注册到系统中。
7.列出分机组

8. 添加分机组

9. 路由列表

这里的路由是整个系统的路由,不管是内呼内,内呼外,外呼内等,还是呼队列,ivr,分机直转都需要走这个地方的路由。
10. 新建路由

11. 路由明细

列出路由中具体路的明细,一个路由有多条明细
12. 添加路由明细

13. IVR列表
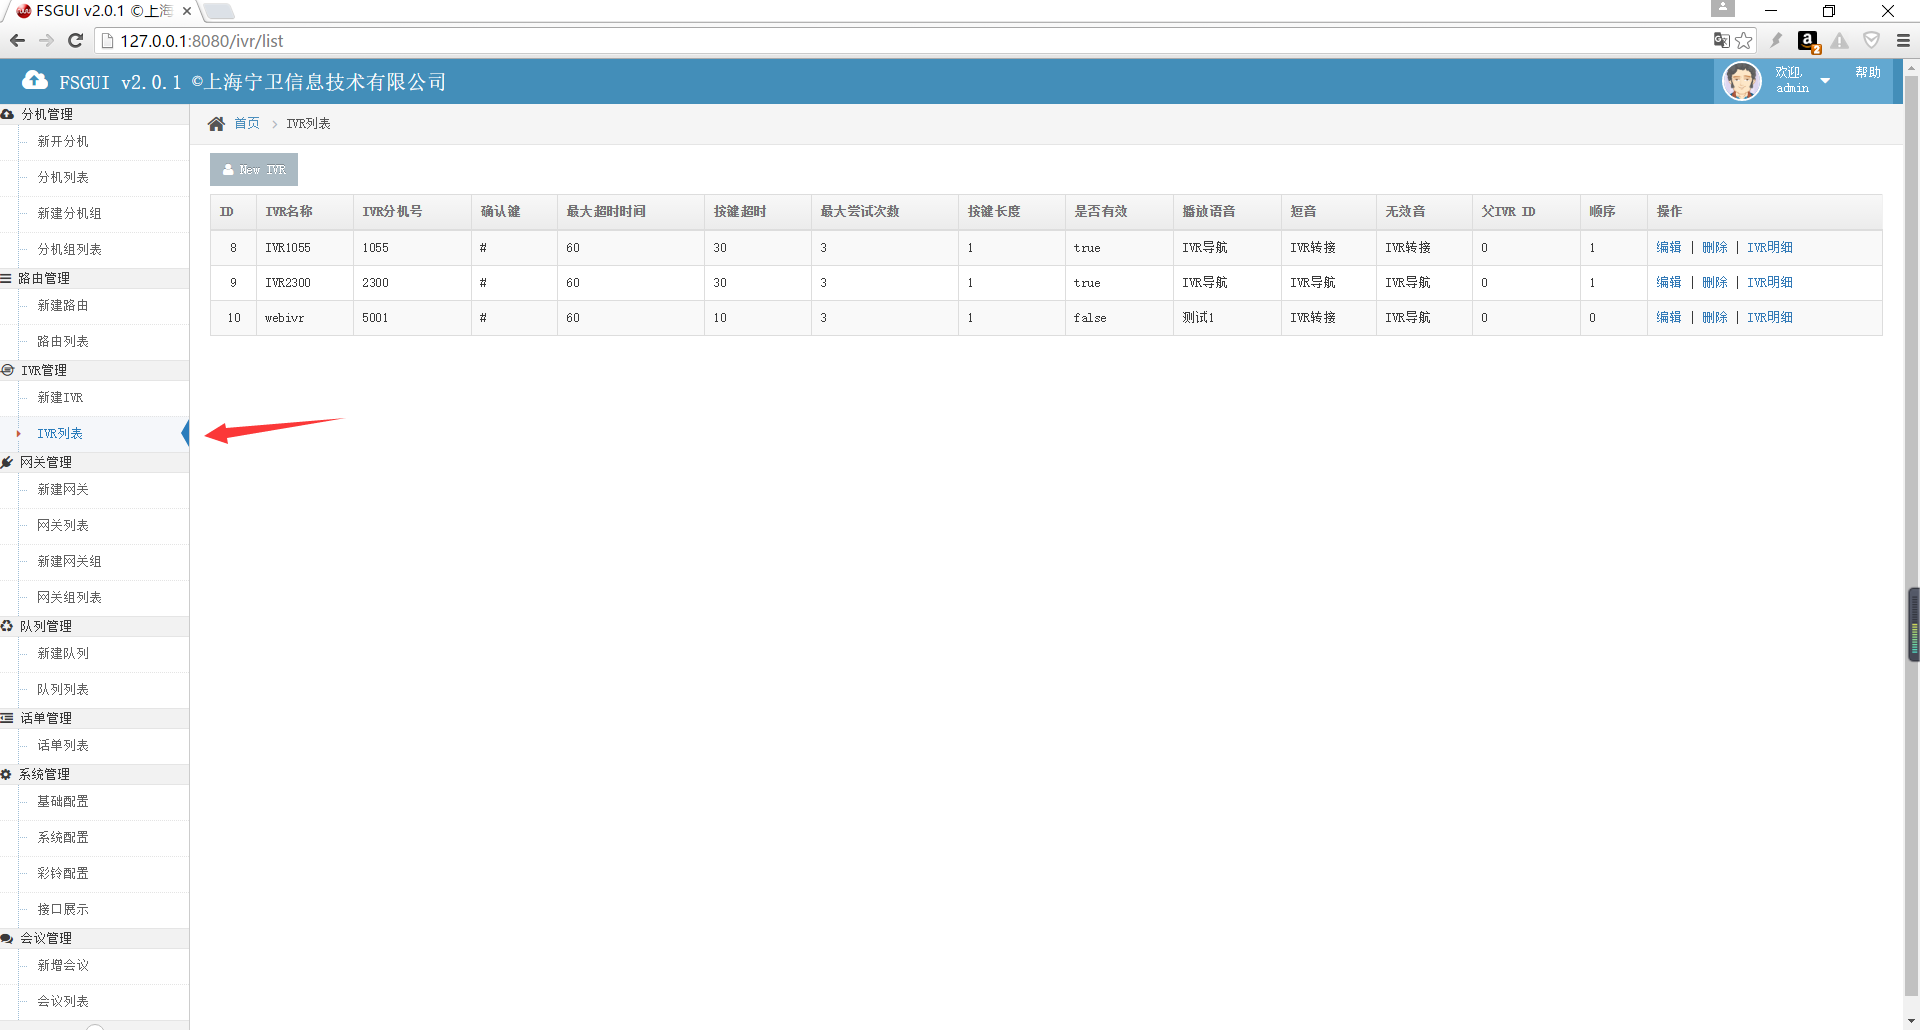
IVR可以嵌套,即第一层ivr下再转给第二层ivr,第二层ivr再转给第三层ivr
14. 新建IVR

15. IVR明细


16. 添加IVR明细

17. 网关组列表

18. 添加网关组

19. 网关列表

20. 添加网关

当前免费版不提供批量导入网关配置功能,收费版可提供
21 队列列表


22. 添加队列

23. 话单管理

24. 系统配置

用于进行了路由,ivr等变更时,需要通知后台底层应用重新加载数据,否则还是跑旧数据应用
25. 接口展示

全部为restful的接口,可以为php,c#,java,golang,ruby等开发语言提供管理控制接口,暂时分机状态需要由另一端语言去查询和操作,下个版本会全部由restful接口实现
26. 会议管理


由restful接口进行处理,即由平台发起一个conference,而不提供由平台等待外部呼叫呼入conference
27. 黑名单


###软件著作权
